6 min read
Content Pages
Content Pages is a section of the app where a menu lists a set of pages with custom content. It is managed by the content managers of the app and most often used for displaying Store Finder, FAQs, Privacy Policies, or other similar informative content. This is typically content that, whilst important, it is not desired to be the centre of the app and thus not need to be mentioned or linked to from the home screen of the app.
Navigation
Pages are typically added to the Poq apps as the rightmost menu option in the bottom navigation bar on both iOS and Android, as recommended by our reference installation.
Pages could technically be placed elsewhere in the navigation or could be hidden altogether. Please talk to your Customer Success representative if you would like to change the navigation structure of your app.
Creating and Managing Pages
Pages can be managed via the Poq Content Management System (CMS). Once logged in, you can find Pages under the Content section.
Page Structure and Management
On the left hand side, there is a tree that shows all the pages that are already created and their parent/child relationship. This is useful to get a quick understanding as to how the pages are structured, as well as accessing any page's editor view by just clicking on them.
In the centre of the CMS screen you will find the grid view of the parent pages. This provides more information on each page, namely their creation date, last saved date, and which platform(s) they are visible on. The little icon left of the Page titles can be used to change the order of pages using drag and drop.
A new page can be added via the "ADD NEW" button just above the grid view and you can also delete any page by clicking the "X" icon in the right side of the grid view.
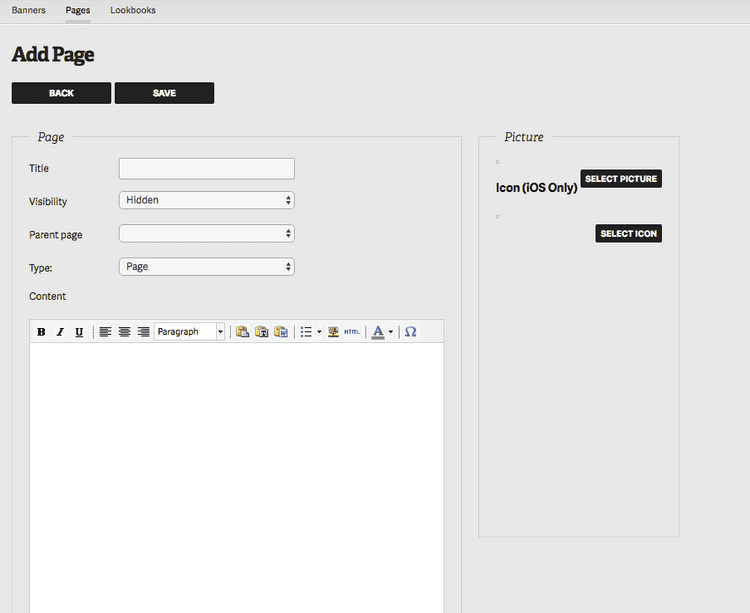
A new page can be added via the "ADD NEW" button. To create your parent pages, you need to give them a title (i.e. “Events”) and a type, and leave the rest of the fields blank.
Add a new subpage with content
A subpage sits underneath your main menu of parent pages.
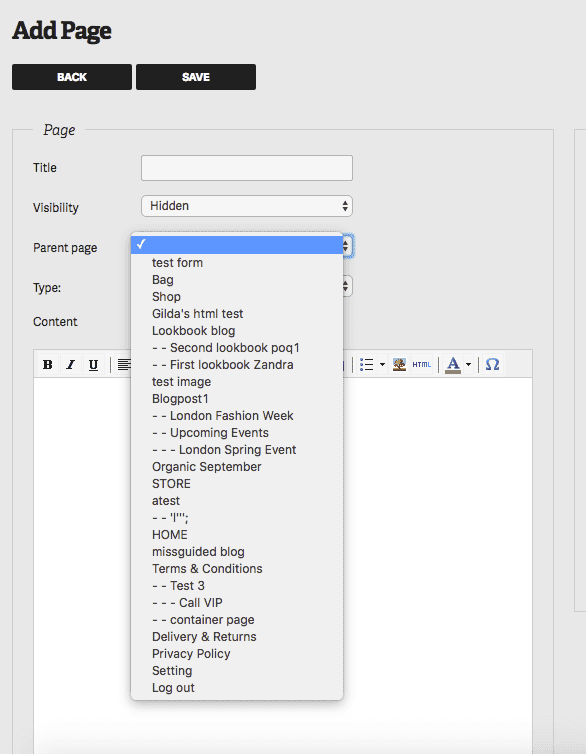
To add a subpage, open up the ‘Add New Page’ option. Then select the “Parent Page” dropdown menu, and decide which parent page you would like the subpage to sit under.
Page Types
Pages are essentially built from building blocks that either link to different type of content, other parts of the app or are just visual elements for separation and grouping.
Page
This is the one of the most often used page types. It's essentially a custom page, designed specifically for the app using HTML. You can do this via the embedded WYSIWYG editor or by editing the source code (click Tools and select Source Code in the editor). The HTML editor supports full HTML5 and HTML4 syntax including html tags, tables, blockquote, CSS, images, video iframe and form.
A couple of tips to make the most of them:
- Copy and paste pages from your website (e.g. blogs) into the page box
- Click on the html button to see the html text from the page
The background colour can be changed by going into the My Account > Settings > App CSS within the CMS. In the example below, the background colour is white, however you can change it to meet your requirements:
.appcontent { background-color: white;}.appcontent img { width: 100% !important; height: auto !important;}.appcontent-ipad { background-color: yellow;}Otherwise, if there are too many GIFs or large JPG files added to a Page, it will drastically increase the memory usage in the app.
Hyperlink
Hyperlink is another of the most popular page types. It allows clients to link an existing webpage. You can do this simply, by entering the URL into the CMS once the Hyperlink page type is selected. The app will then display this in an embedded webview.
This type of page is particularly useful to embed the likes of terms and conditions, privacy policies, or size guides to your app. These pages are already created for the website and any updates there will also update the relevant content in the app. That way you won't have to do it twice.
Making the most of embedding a web URL: When using the Hyperlink page type, make sure that you are blocking the navigation functions of your websites. You want to avoid the user starting to browse products inside a webview which is not connected to the native app's shopping capabilities. Best practice is to hide the main navigation as a whole and just display the content.
You should listen for your Poq App WebView User Agent and change the CSS accordingly to where your website is being loaded from. Therefore, when your website is loaded from a Poq App WebView, you should hide all your website navigation elements among any other layout or configuration that your website might need.
You can learn how to identify requests from your Poq app.
Store Finder
This page type is essentially just a link to the Store Finder screen of the app. It's very common that clients use this in their apps and place the Store Finder under then "More" or "My Account" menus in their bottom navigation. You can find out more information about how to configure your Store Finder screen here.
Formatting Types
There are two page types that don't add any functionality but are purely for aesthetic and organisation purposes. These are:
- Section Header - a title that helps you group multiple other Pages into one block of content. Place this before any set of pages that have similar content in them.
- Separator - this adds a separator line between pages. It might come in handy if you are creating a lot of them or if you want to have additional separation on top of the Section Headers.
Other Types (deep links)
There are a couple more page types that might come in handy, but these are typically just links to other parts of the application. Meaning that based on your catalogue or pre-existing content, you can also point to these from the Pages.
- Shop - opens the list of categories.
- Product Category - opens the product listing screen (PLP) for a pre-specified category. You will need to select the category when setting up this Page type.
- Lookbook - opens a lookbook that has been already created in the CMS (under Content > Lookbooks). You will need to select the Lookbook from a list of existing Lookbooks when setting up this Page type.
- Scan - Opens the Barcode Scanner feature of the app with the camera view.
Custom deep link: should you want to link to a different existing screen of your app, this will likely be possible. You can use the Hyperlink Page type and enter a custom app deep link URL. If you need help finding a deep link URL, please get in touch with your Customer Success Representative.
Parent and Child Pages
To be able to manage a logical order of large volumes of Pages, it is made possible to create Parent and Child pages. This is simple:
- Just create a new page with the type set to Page.
- Don't specify any content, but set the Title according to what you'd like the parent to be called in the app.
- Create a new page and select the name of the page you have just created in the Parent Page field.
Parent and child pages will be both shown in the left hand side Page tree. To reorder, change or edit them, just simply click on the parent page in the grid view. On the Page detail view, you will find a section called Subpages on the right hand side. Here you can drag and drop and delete the same way as in the grid view, or you can click on the page title to edit the child page.
Platform Segmentation and Visibility
It is possible to create Pages that only appear on certain types of devices. This can be done by setting the checkboxes accordingly at the bottom of a Page's detailed view, under the Display options section. The three segmentation options are:
- Show on iPhone
- Show on Android
- Show on iPad
Tip: If you have separate FAQ page for a platform specific feature like Apple Pay or Google Pay, you might want to make it specific to a platform. Likewise, the larger screen real estate of an iPad might be better suited for linking a different Hyperlink page for some of your content.
Linking to Pages
Once a page is created, it can also be linked to from other sources. The most commonly used place might be a Banner on the home screen. When creating a new Banner, a list of your Pages will be available where you select the link type. Find out more about how to manage your Home Screen Banners.
Country Switcher
If you have a Country or Currency Switcher add-on on the Poq platform, this will likely appear as a Page. This will typically be configured by the Poq team when enabling this add-on for your app. Once there, you can freely rearrange it with the drag and drop functionality.

