1 min read
Create your first BFC
The goal of this guide is to prepare your environment for developing a functioning BFC for a Poq app frontend.
Prerequisites
Install Git Client
Install NodeJS 14 LTS (Soon will be updated to the 16 LTS)
Install Yarn 1.22.x (Soon will be migrated)
To accomplish further steps you must have access to the Poq resources, please contact the Poq Support Team.
Resources you need to proceed are the following:
- The Poq GitHub Poq.ApiTemplate.Node
- NPM read-only token to access private registry to install SDK packages.
Project Setup
Clone Poq.ApiTemplate.Node.
# Make sure you have all necessary rights to access it> git clone git@github.com:poqcommerce/Poq.ApiTemplate.Node.git# Move to cloned repository and you'll see.# ├── .git# ├── .gitignore# ├── .vscode# ├── NestJS.API.BFC# ├── PULL_REQUEST_TEMPLATE.md# └── README.mdAt the moment we support only NestJS SFCC BFC Template.
Move NestJS.API.BFC folder to your projects folder and rename it accordingly to the project name (e.g: Super Retailer BFC).
Update PROJECT NAME in
README.md,package.json,Dockerfile.Create
.npmrcand put line there//registry.npmjs.org/:_authToken=__YOUR_TOKEN__then add it to.gitignore.# Caution: Works on UNIX Systems# Creates .npmrc file with defined line and then append .gitignore with .npmrc> echo "//registry.npmjs.org/:_authToken=__YOUR_TOKEN__" > .npmrc && echo ".npmrc" >> .gitignoreInside project folder install project dependencies via
yarn installcommand.Check whether everything is ok by running
yarn lint:type && yarn build.NestJS BFC SFCCExplore files in the
configfolder. Any project requiresappIdentifier,clientID(from OCAPI),baseUrl(OCAPI and the Poq platform).If there are any questions, please let us know.
Make sure configuration is in place, then start app via
yarn start:dev.Congratulations!
If all the steps are done so far, then you're ready for BFC development.
Default App includes everything to handle default mobile client as is.
Setup Mobile client (Optional)
This section describes what needs to be done to check your local BFC in conjunction with mobile client.
This part of the guide requires Charles proxy to be installed.
If Charles software is not available for you any analogue can be used.
It's useful for developers to connect your local BFC server with mobile to check their interaction and connect all the dots.
- Request for distributive of the mobile client (IOS or Android);
- Install Charles proxy;
- Configure it for iOS: How-To-Charles-Proxy-IOS;
- Or for Android: How-To-Charles-Proxy-Android;
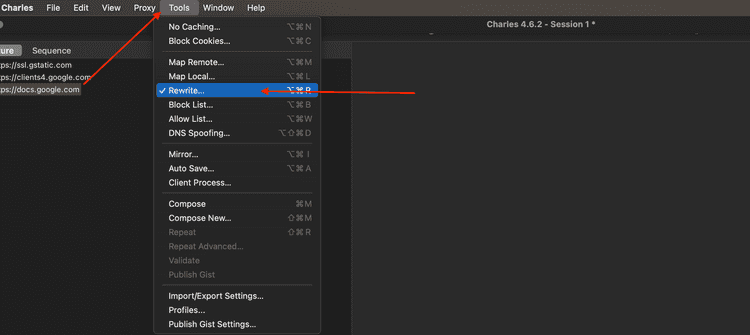
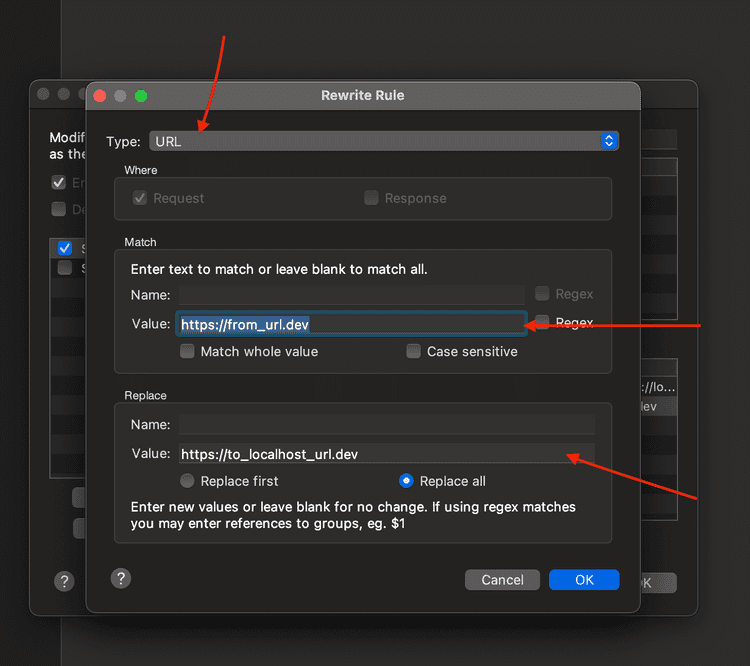
Charles can rewrite target urls (use this function to forward requests from a mobile device to a local machine aka local BFC);
After you're clicking on Rewrite, then use URL and values as depicted below.
Congratulations!
If all the steps are done so far, your mobile client should work in conjunction with BFC on local machine.

