4 min read
Checkout Context
The Checkout context is where your customer adds their chosen products to their cart or wishlist, and then reaches the checkout.
Included in this process is the transfer to a webview - a connection to your website where the payment and checkout can be completed, before the customer returns to the native screens within your app.
The checkout context contains:
- Wishlist
- Cart (sometimes called Bag)
- Checkout via webview
Cart (AKA Bag)
The Cart screen, sometimes known as the 'Bag' screen, is where your customer's chosen items are stored before they checkout. This is an expected feature, long established in online shopping.
Customer perspective
The Cart is displayed in the Tab bar navigation at the bottom of the screen.
Your customer can add products to the cart from any screen that features the Add to cart/bag button. This feature appears on the following screens:
- PDP - the product details screen.
- Wishlist.
Anatomy of the Cart
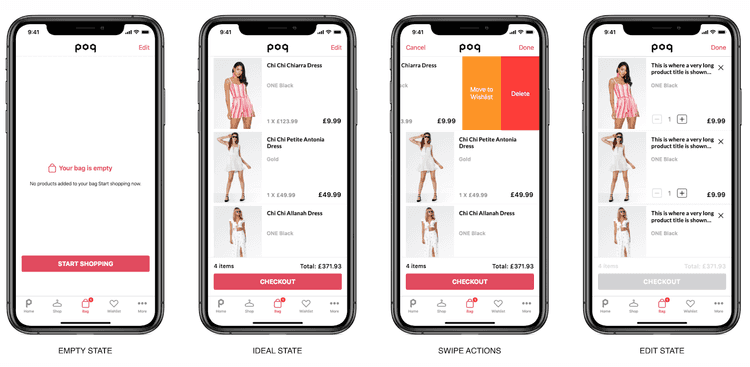
The Cart screen is comprised of the following information and interactions:
- In the Tab bar - icon with label showing number of items in the Cart.
- Edit button in the top right of the screen allows customer to make changes to the items in their cart.
- In Edit mode, your customer can increase the quantity of items in their order.
- In Edit mode, an X icon appears beside each item which can be used to delete it from the cart.
- In Edit mode, the Checkout button is disabled.
- In Edit mode, a Done button in the top right of the screen. Once tapped, the Checkout button becomes active again.
- Swipe right to left to delete an individual item. Swipe part of the way to reveal a delete button. All the way to delete outright.
- Tapping anywhere on an item opens its product details screen.
- Checkout button takes the customer to the checkout screen.
Configuring your Cart
The Cart can be customised using the Checkout Context of the Poq SDK. Using the SDK, a developer could, for example, add an Add to wishlist icon to the Cart screen.
Wishlist
The Wishlist screen gives your customers a space in your app to save products they like, without adding them to their cart. When they are ready to buy, they can easily add products from their Wishlist to their Cart and then check out.
It is accessed from the tab bar at the bottom of the screen.
Customer perspective
The Wishlist is displayed in the Tab bar navigation at the bottom of the screen.
Your customer can add products to the Wishlist from any screen that features the heart-shaped wishlist icon. This feature appears on the following screens:
PDP - the product details screen.
PLP - the product list screen.
Product list modal in Lookbook.
Product detail modal in App stories and Lookbook.
Anatomy of the Wishlist
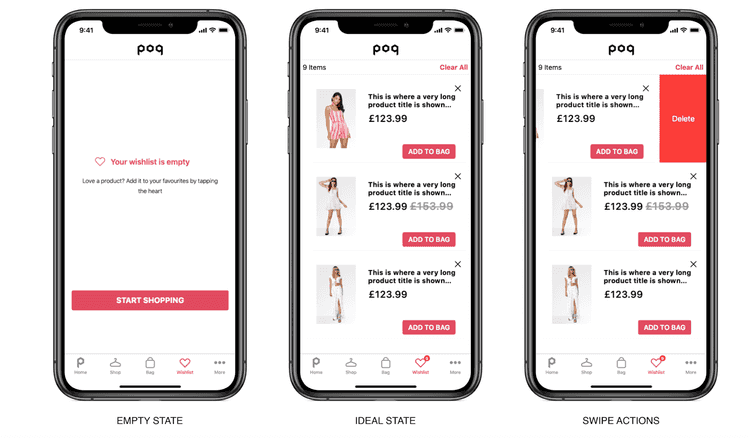
The Wishlist screen is comprised of the following information and interaction:
Tab bar icon with label showing number of items in the Wishlist.
Top left counter showing number of items.
Clear all label at the top right of the screen.
Items including: Image, title and price.
Add to bag/cart button.
X symbol to remove individual item from the Wishlist.
Swipe right to left to delete individual item. Swipe part of the way to reveal a delete button. All the way to delete outright.
When the Wishlist is empty a message is displayed.
Button with call to action taking the customer to the shop screen.
Tapping anywhere on the item opens its product details screen.
Configuring your Wishlist
The Wishlist can be customised using the Checkout Context of the Poq SDK. Using the SDK, a developer could, for example, add an Add to wishlist icon to the Cart screen.
Web Checkout
In order to allow customers to pay for their shopping, you can connect your iOS Poq app to your web payment screens.
Your customer still sees the screens through the app window, but payment is taken in the same way as it is via your website.
Use this document to get the code you need to add to your web payment pages to make checkout work on your app.
How it works
Poq web checkout works by adding a JavaScript library to your web-based checkout to enable communication between your web page and the Poq app on your customer's device.
Once integrated, your web checkout pages can listen for events from your app and send messages to your Poq app. It can be triggered whenever a customer taps 'checkout' on your app, and subsequent events in the checkout process.
The bridge allows data about your customer's order to flow seamlessly and securely between the payment screens of your website and your app.
You use the JavaScript bridge by adding a small snippet of JavaScript into each web page that communicates with the app in the checkout process.
Apple Pay
Customers using your iOS Poq app may wish to pay using Apple Pay. You can add the Apple Pay button to your app.
Poq can guide you through the process of adding this to your web checkout screens for a secure Apple Pay checkout experience.
When using Apple Pay in your Web checkout screens, the customer's journey looks like this:
The customer's journey, and the background process looks like this:
The customer goes to the checkout in your app to pay for their shopping - which launches the web checkout page. This triggers an Apple Pay button to be embedded in your web checkout page.
The customer taps the Apple Pay button. Your web checkout page calls your Poq app, requesting that the Apple Pay authorisation process is started on your customer's device.
Your customer authorises the Apple Pay transaction in the usual way. Your Poq app sends the relevant part of an Apple Pay token to your web checkout.
Your web checkout page can then pass this data to your Payment Service Provider, completing the payment.
The customer's journey through the web checkout is completed as normal.


