2 min read
Onboarding: Introduce your app to new users
Overview
Use the App Manager Onboarding tool to manage onboarding pages and modify how push opt-in works in your app. You should aim to build pages that will introduce new users to key features of your app and let them know why they should shop with you.
To improve the performance of your app launch time, onboarding pages are published in app releases so modifications to your onboarding flow require a new app release.
Select a template
All onboarding pages share a common layout. You have two templates to choose from that will define how your pages will appear.

- The “Top Image” template provides an image with title and description labels.
- The “Background Image” template provides a background-image only, no labels.
With the appropriate image, the “Top Image” template can provide slick, accessible introductions to your app. If you find you need to customise the layout further, you can provide fullscreen images to the “Background Image” template containing pictures and labels.
Once a template is selected you will be presented with the main editing interface of the tool.
The editing interface
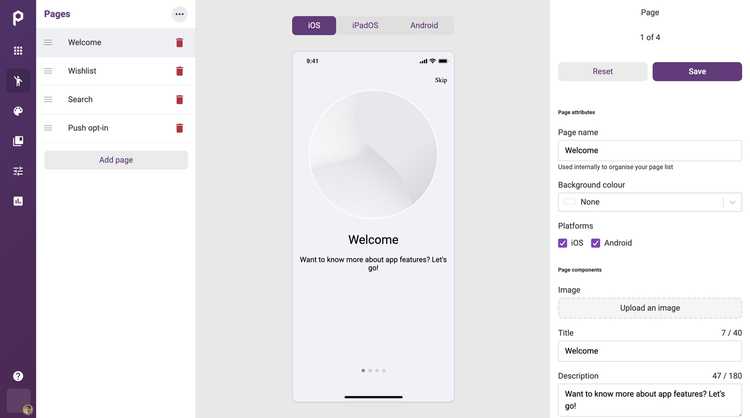
The onboarding tool displays the ordered list of pages on the left hand side. If you're starting out, you are given an initial set of pages as an example flow. You can click the red trash icon next to any page to remove it but you must have at least one page if onboarding is enabled. Click Add page beneath the list to add a new page to your onboarding flow.
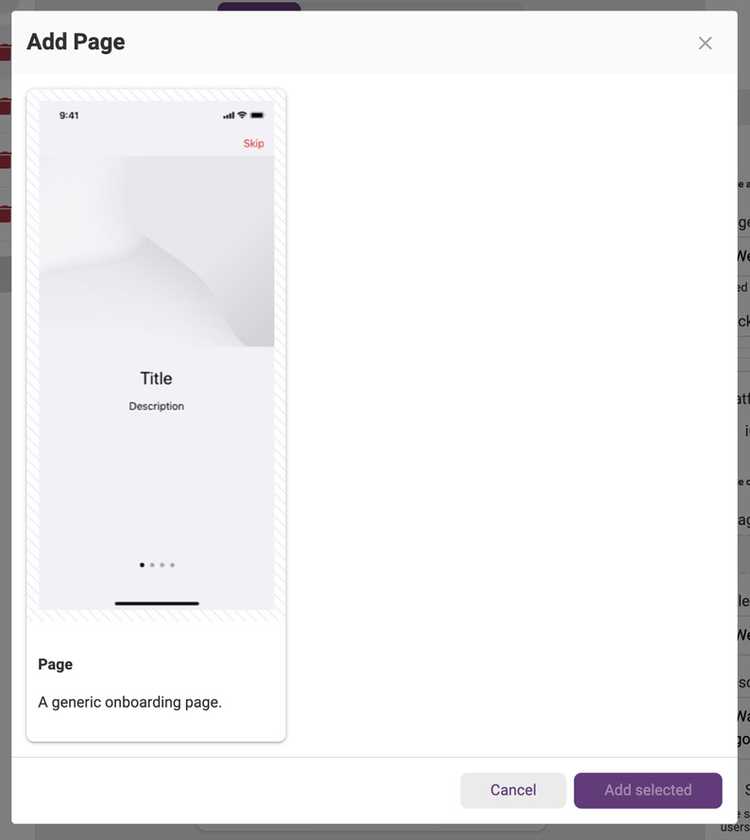
Add page
When adding a page, you are given a choice of page types. The basic page type allows you to add images and labels with default behaviour - providing information and allowing a user to move to the next page or skip.
On iOS, permissions to send push notifications must be explicitly allowed by the user. For this reason, we provide an easy way to display the push notification prompt using the “Push Notifications” page type. You can only have one page with this assigned type as you only want to bug the user once at this point in their journey.
Now that the page is added, the inspector displays attributes and editable components that you can change to build your desired page. Clicking Save in the inspector updates the device preview and saves the page.
Edit a page
To start editing a page, click the name of the page in the list. In the inspector, give the page a unique display name in the Page name field so that you can keep your pages organised. The following page attributes allow you to set the background colour of the page and toggle whether it is visible on certain platforms.
In the Page components section, you can modify the content on the page by uploading an image and updating the labels (Top image template only).
If the page is not the last page in the flow, you can choose to hide the skip button to prevent the user from skipping the rest of the onboarding by unchecking the Show skip button checkbox. When enabled, the skip button links to the home screen.
Click Save to confirm your changes. The device preview will update with your latest attributes and components.
Disable onboarding or choose a new template
If you wish to disable onboarding for your app (you want new users to go straight to the home screen) or want to switch to a different template, you must reset your pages.
- In the page list on the left hand side of the tool, click the More ⋯ button.
- Click Reset onboarding template.
- Confirming you wish to delete the pages you've built and reset, click Delete pages and reset.
- If you wanted to switch templates, choose a new template.

