7 min read
Home Screen Banners
The Banners tool in the Poq App Manager is used to control the content blocks on the homescreen, starting below the App Stories section. It allows users to create a variety of types of content, linking to many different areas of the app. The ability to schedule and preview content gives users full control of the app homescreen experience and any changes are published in real-time, delivering new content to your users immediately.
For the legacy CMS guide, please click here.
Published, Draft and History
There are three views available in the left-hand navigation bar in the Banners tool; published, current draft, and history.
Published
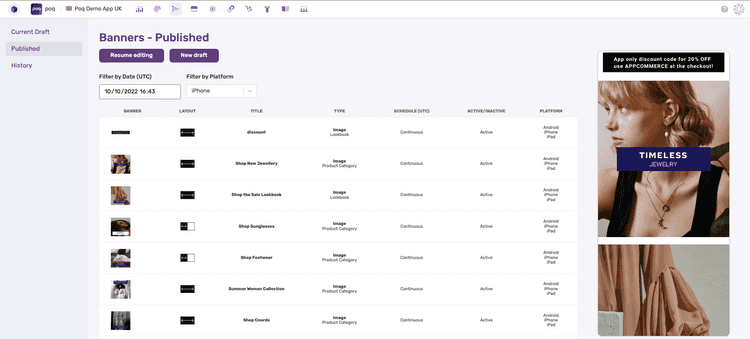
The published view is the first view you’ll see when you load the Banners tool. It displays the set of banners as they are currently configured for the app. You’ll see the banners list containing information about the banners that are set up as well as a visual preview on the right of the screen which is scrollable.

The list of banners and the visual preview are both controlled by the filter fields near the top of the screen. This allows you to preview the banners for specific dates and times in the future, giving you confidence that any scheduling has been set up correctly. You can also filter by platform, if you are configuring different banners for iPhone, Android or iPad.
When you are ready to make changes to the banners, you can select “New draft” to create a new draft, or “Resume editing” to continue editing a draft you created earlier. Currently, it is only possible to have one draft at a time to avoid conflicting changes by multiple users, so make sure to communicate well with colleagues who might also be making changes.
Current Draft
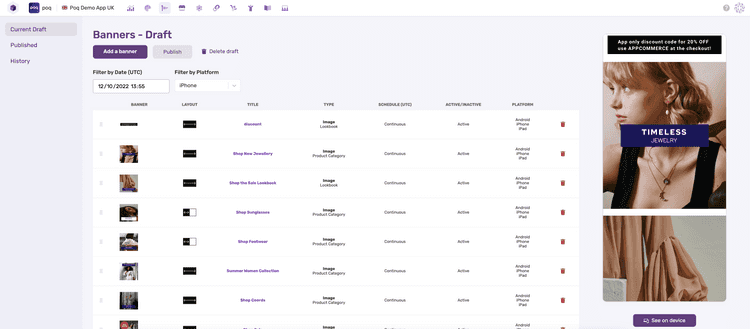
The draft view is where users can make changes to the banners they want to be displayed in the app. The overview screen is very similar to the published view, giving the user both a list of the banners and a visual preview, with a few more actions available to the user.
- The user can change the order of the banners displayed by dragging and dropping the banner
- The user can delete each banner by clicking on the bin icon on the right side of the banner list
- The user can create a new banner
- The user can publish the current draft to the live app
- The user can delete the current draft, taking them back to the published screen.

The final additional feature on the draft view, is ability to see the draft banners on a mobile device by clicking the “See on device” button underneath the visual preview. This generates a QR code that you can scan using your smartphone’s camera, which will launch the live app, but populate the homescreen from the draft, rather than published set of banners. This requires the user to have the app already installed on their device.
History
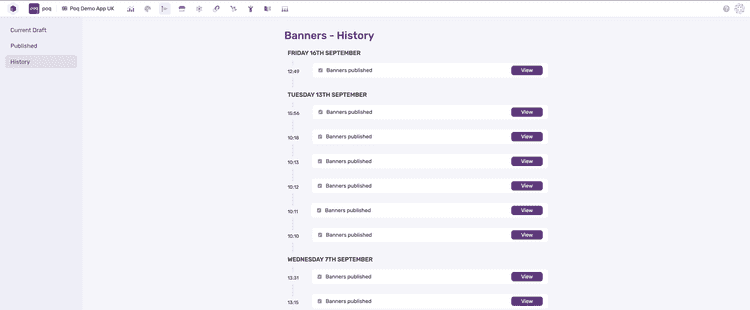
The history view displays a timeline of the changes made to the published banners. It allows you to create a new draft from a historic version, which can help if you need to revert changes made.

Previewing and Filtering
The visual preview shown in the banners tool can be used to check the configuration of your banners for scenarios you want to create ahead of time, for example, setting up weekend promotions to run Saturday and Sunday.
Filtering
You have the option to filter by date and by platform. The changes are reflected in both the list and the visual preview. Banners that are scheduled and do not match the filter conditions will be shown as inactive in the list and hidden from the visual preview.
On Device Preview
In the Draft screen, there is an option to see the draft on device, so that you can check exactly what the draft set of banners will look like in your mobile app. This also works with the filters mentioned above so ensure you have set up the date, time and platform before clicking on “See on device”. Clicking the button will show a pop-up with a QR code you can scan on your device’s camera, which will open the app and load the draft set of banners on the homescreen. You will need to make sure you have the app already installed on your device.
If you see an error reading, “App bundles are not set up”, please raise a ticket with our support team.
Creating a Banner
To set up new content, you will need to create a new draft, or edit the existing one. Once in the Draft section, click “Add a Banner” to open the banner creation screen. Here you can select from a number of content types. This guide will cover each one individually.
Content Types:
- Image/GIF
- Video
- Product Carousel
Image or GIF Banners
Image banners will likely represent most of the content on your home screen. To set up an image banner, follow these steps:
- Give the banner a title. This will be used to identify the banner in analytics, used by voice assistance technology to aid visually impaired users and used as a screen title should the banner link to other content like a PLP.
- Set the Content type to Image/GIF.
- Set the Action from the dropdown. This is to control what happens when the banner is tapped on. The options are as follows:
- None - the banner will do nothing when tapped.
- Page - link to a page created in the CMS, choose from the dropdown list.
- Product Category - link to a Product List Page, choose from the category picker.
- URL - if a webpage URL is configured, the app will open the page in webview. If an app deep link is configured, the app will navigate to the corresponding screen.
- Shop - link to the shop screen.
- Lookbook - link to a lookbook created in the CMS, choose from the dropdown list.
- Store Finder - link to the Store Finder feature.
- Upload a new image file, or select one that was uploaded previously.
- Select the banner layout either as full width or half width. Half width banners can be used to make 2 by X grids on the home screen and will need to be followed by another half width banner to complete the row.
- Set the padding if required. This is optional.
- Set the active or inactive state. Inactive banners will remain hidden regardless of their scheduling. This is useful for banners that are still a work in progress. Active banners will only show if they are scheduled to do so.
- Set the schedule for when this banner should show. This is optional and leaving it blank will mean the banner is always shown until it is removed.
- Set the platforms you would like this banner to be displayed, iPhone, iPad and Android.
Once these steps are completed, you need to save your banner which will return you to the banners overview screen, where you’ll be able to preview it and publish the draft when satisfied with your changes.
Video Banners (Available from Andromeda v21)
Video banners are played automatically in-line when the user opens their home screen. Similar to Instagram, they are intended for short-form video content, no longer than 30s, which will play on loop and without the ability to pause, fast forward or rewind. Videos can have audio, but by default the video will play on mute until the user manually unmutes it. To set up a video banner, follow these steps:
- Give the banner a title. This will be used to identify the banner in analytics, used by voice assistance technology to aid visually impaired users and used as a screen title should the banner link to other content like a PLP.
- Set the Content type to Video.
- Set the Action from the dropdown. This is to control what happens when the banner is tapped on. The options are as follows:
- None - the banner will do nothing when tapped.
- Page - link to a page created in the CMS, choose from the dropdown list.
- Product Category - link to a Product List Page, choose from the category picker.
- URL - if a webpage URL is configured, the app will open the page in webview. If an app deep link is configured, the app will navigate to the corresponding screen.
- Shop - link to the shop screen.
- Lookbook - link to a lookbook created in the CMS, choose from the dropdown list.
- Store Finder - link to the Store Finder feature.
- Set the Video URL. It is currently the responsibility of the client to host their videos, and the file URL will need to be in an accepted video file format, such as mp4 or MOV.
- Set the video aspect ratio. The iOS and Android apps need to create the space for the video before it loads to avoid the screen jumping. By setting the correct aspect ratio, you ensure that the video is not cropped and is shown without borders.
- Set the active or inactive state. Inactive banners will remain hidden regardless of their scheduling. This is useful for banners that are still a work in progress. Active banners will only show if they are scheduled to do so.
- Set the schedule for when this banner should show. This is optional and leaving it blank will mean the banner is always shown until it is removed.
- Set the platforms you would like this banner to be displayed, iPhone, iPad and Android.
Product Carousel Banners (Available from Andromeda v21)
With Product Carousel banners, you have the ability to promote your products directly on the home screen. These are shown with some product information like their price and product title and tapping on a product takes you straight to the Product Details Page. To set up a product carousel banner, follow these steps:
- Give the banner a title. This will be shown as a title for the carousel . It is also used to identify the carosuel in analytics and is used by voice assistance technology to aid visually impaired users.
- Set the Content type to Product Carousel.
- Set the Carousel Source from the dropdown. This configures where the products in the carousel are pulled from.
- Product Category - Select a category from the category picker and the carousel will load in the first set of products
- Recently Viewed - This configuration pulls the customers’ most recently viewed products into the carousel.
- Custom URL - This should only be used in custom solutions if set up by your development team, for example to pull in recommendations from an engine.
- Set the active or inactive state. Inactive banners will remain hidden regardless of their scheduling. This is useful for banners that are still a work in progress. Active banners will only show if they are scheduled to do so.
- Set the schedule for when this banner should show. This is optional and leaving it blank will mean the banner is always shown until it is removed.
- Set the platforms you would like this banner to be displayed, iPhone, iPad and Android.